How to add a free PDF preview to your Shopify product page
Let shoppers read the first pages of your PDF before they buy. Choose the pages and the overlay text, then add a preview button to your Shopify product page.
Published 6 min read
On this page
In a bookshop, people flip through a book before they buy it. On a Shopify product page, a PDF is a cover image and a description, so shoppers have to guess what's inside. A short preview lets them read the first pages before they pay, and lets them check the style, the level and the layout for themselves.
This guide covers what to put in a preview, how to set one up with Imprint, how to add a Read a free preview button to your product page, and where else to share the link.
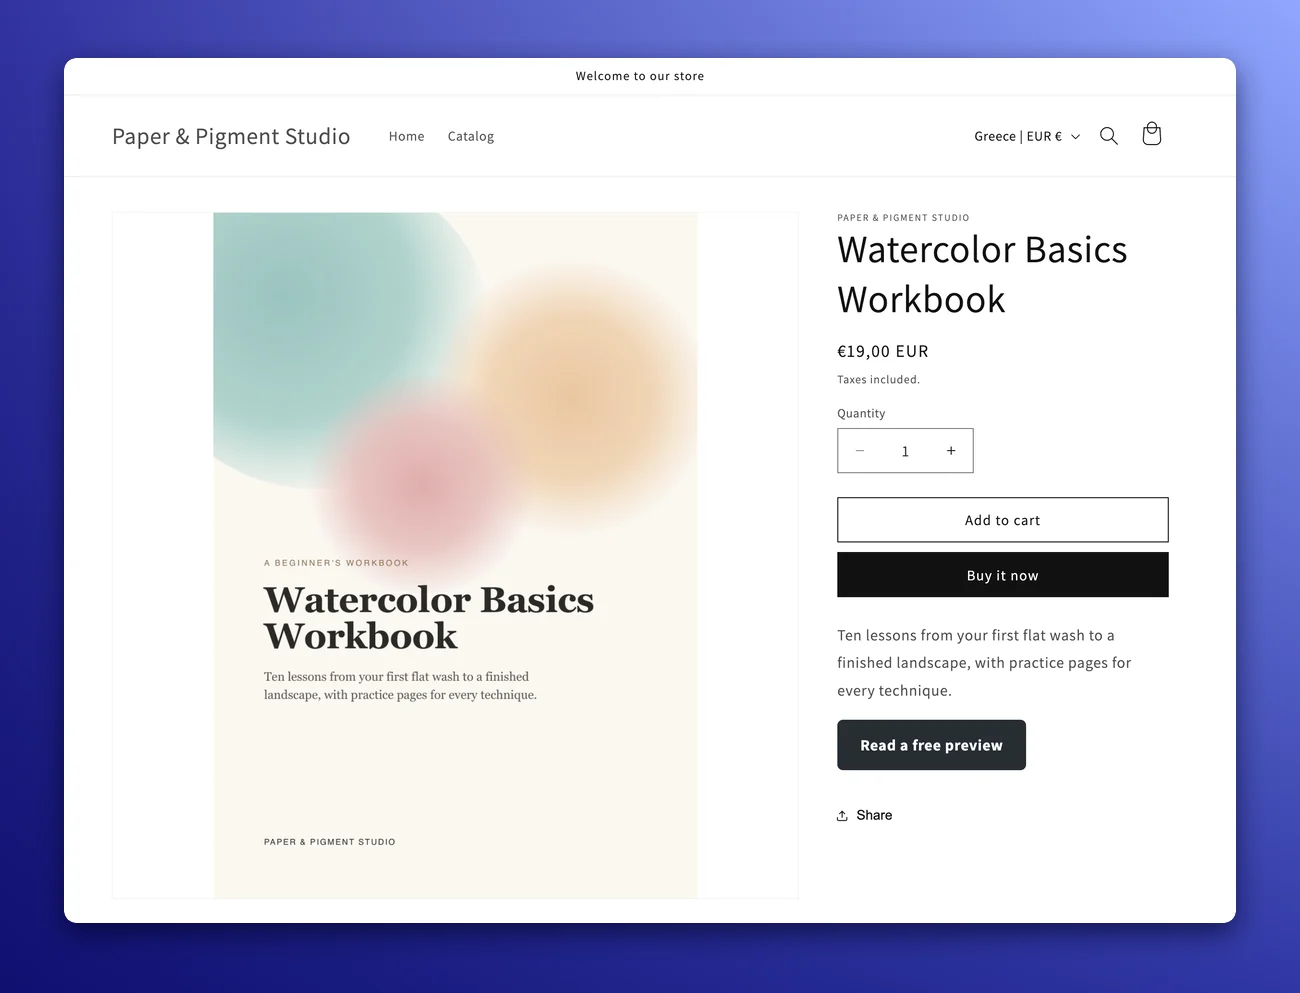
What a good preview shows
Imprint builds the preview from the first pages of your PDF, from 1 to 10 of them. Before you choose a number, open your file and look at what those pages are.
- Get past the front matter. If your PDF opens with a cover, a copyright page and a blank page, a three-page preview shows nothing a shopper cares about. Include enough pages to reach the table of contents or the first lesson.
- Show your best ordinary page. A page of real content, like a lesson, a recipe or a chart, shows the quality better than the cover does.
- Don't give the product away. A one-page printable or a short pattern can be used straight from the preview. If your first pages are the whole product, keep the preview to the cover and contents, or offer a free sample with an excerpt you pick yourself.
Every page of the preview carries a large, pale overlay text, PREVIEW unless you change it. It keeps the pages readable while making it clear they're a preview. You can use up to 40 characters, with letters without accents, digits and basic punctuation, so PREVIEW, SAMPLE PAGES or your store's name all work.
Set up the preview in Imprint
Public previews are included on every plan, Free included.
- In Imprint, open the product from the Products page and click Preview PDF Stamp next to its PDF. The button appears once the product is saved.
- Find the Public preview section in the right-hand column.
- Set the number of Pages and the Overlay text.
- Tick Add a closing page if you want the preview to end with a link back to the product (see below).
- Click Generate preview.
Imprint builds the preview in the background, which usually takes a few seconds. When it's ready, the section shows the preview's link and the code of a button that opens it.
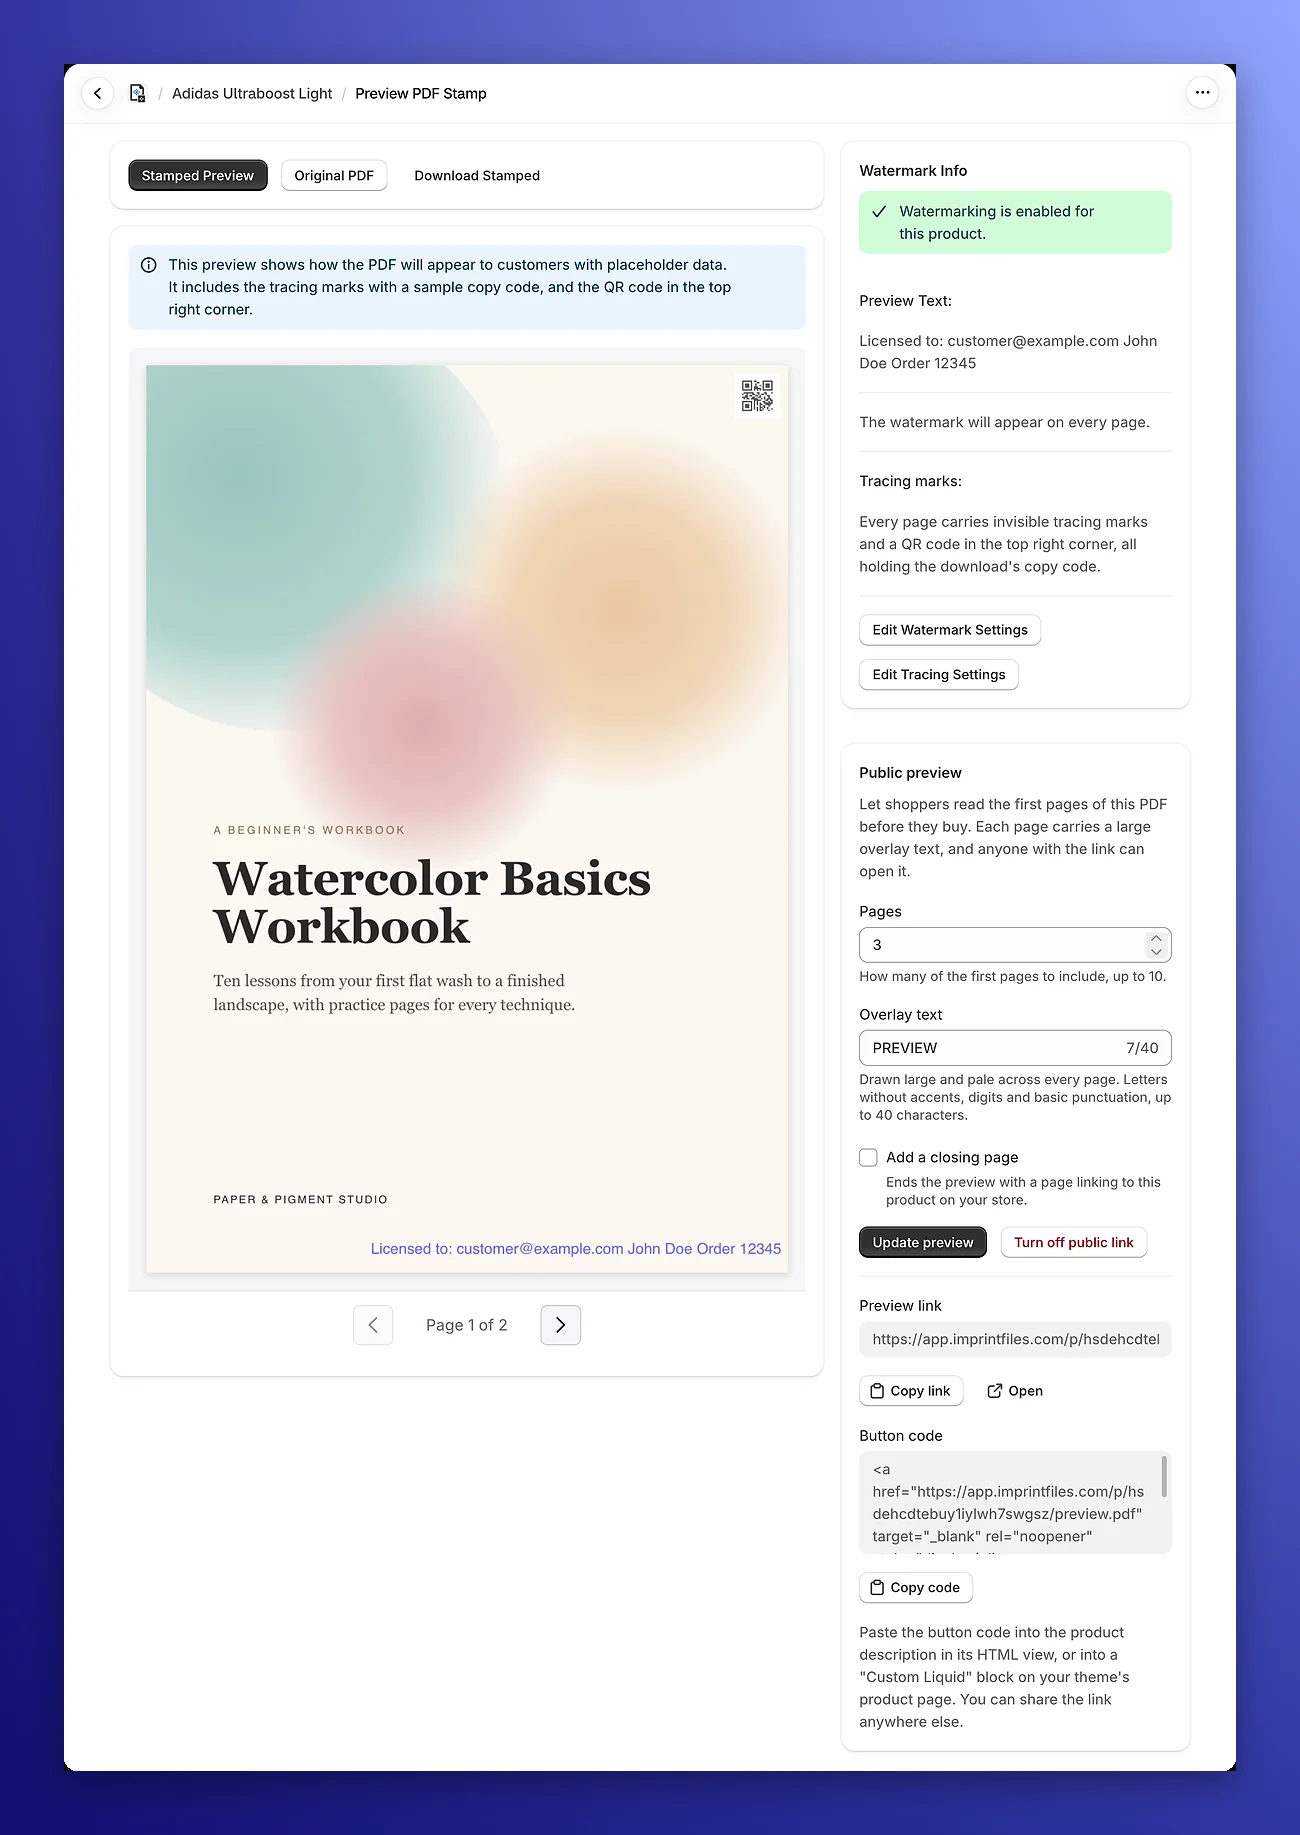
On Basic and Premium, you can change the pages and overlay text that new previews start with under Settings → Samples, so you don't have to set them on every PDF.
What shoppers see
The preview link opens a PDF in the shopper's browser. It has only the pages you chose, with the overlay text across each one, and the closing page if you added it.
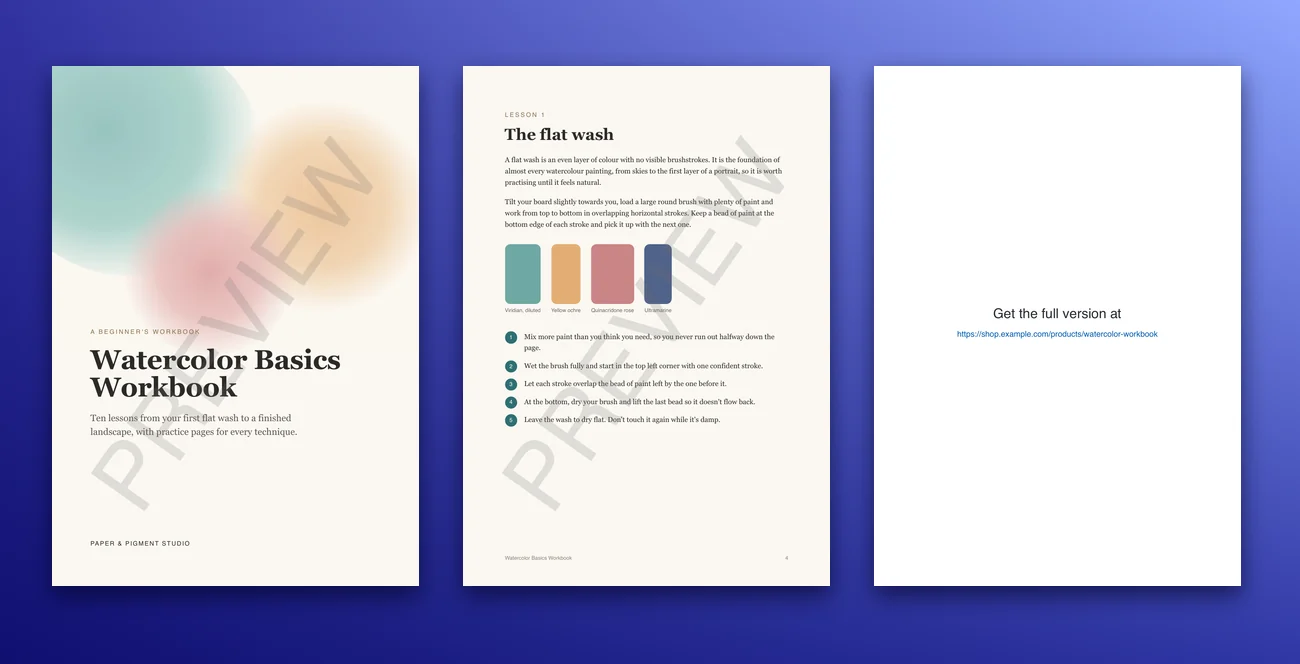
A preview isn't anyone's copy, so it carries no customer details and no tracing marks, and it doesn't count toward your storage.
The closing page
The closing page says Get the full version at, followed by a link to the product on your store. It's most useful when the preview travels without your product page around it, for example when someone forwards the link or opens it from a social media post. Whoever reads it has a way back to buy.
- Free plan: every preview ends with the closing page, and it also says Powered by Imprint.
- Basic and Premium: the closing page is optional, and it never mentions Imprint.
Add a preview button to your product page
The button code Imprint gives you is a link styled as a dark button. The styles are written into the code, so the button looks the same in any theme. If you want it to match your brand, change the background color in the code before you paste it.
In the product description
This puts the button on one product, in any theme.
- In Imprint, click Copy code under Button code.
- In your Shopify admin, open the product and go to its Description.
- Click Show HTML, the
</>button in the editor's toolbar. - Paste the code where you want the button, for example after the first paragraph, and click Save.
In a Custom Liquid block
You can also paste the code into a Custom Liquid block on your theme's product page, in Online Store → Themes → Customize. The block shows on every product that uses that template, and each preview link belongs to one PDF. Use the description for most products, or give the product its own template if you'd rather keep the button out of the description.
You don't need to open the PDF's page each time you want the link. The product's page in Imprint has a Previews and samples card that lists each PDF's preview link, with buttons to copy the link or the button code.
Share the link beyond the product page
The preview link works anywhere, not just on your store:
- in your newsletter, when you announce a new PDF
- in social media posts and link-in-bio pages
- in ads, so people can read before they click through to buy
- in replies to customers who ask what's inside
The link stays the same when you change the preview's pages or overlay text and click Update preview, so you can share it once and keep improving the preview. If you share it outside your store, turn on the closing page so readers can find the product.
Keep the preview up to date
- To change the preview, edit its settings on the PDF's page and click Update preview. The link doesn't change.
- When you replace the PDF, the old preview is deleted with it. Set up a preview for the new file and paste its new button code wherever you used the old one.
- To stop sharing, click Turn off. The link stops working right away, though browsers and caches that already opened it can keep showing it for up to an hour.
When your plan changes in a way that adds or removes the Powered by Imprint closing page, Imprint rebuilds your previews by itself.
Preview or free sample?
A public preview is the quickest way to answer "what's inside?" for everyone. A free sample asks for something in return.
| Public preview | Free sample | |
|---|---|---|
| Who can read it | Anyone with the link | Visitors who sign up |
| What readers give | Nothing | Their email address, saved as a tagged Shopify customer |
| What's in it | The first pages, with the overlay text | The preview's pages, or a separate PDF you upload |
| Plans | Every plan | Basic and Premium |
You can use both on the same product: a short public preview of the first pages for every shopper, and a longer excerpt as a free sample for people who sign up. If the free sample uses the preview's pages, though, turn off the public link so the pages stay behind the sign-up form. The free sample guide explains how.
Before you publish
- Open the preview link yourself, on a computer and on a phone.
- Check that the pages show real content, not just the cover and the copyright page.
- Check that the overlay text doesn't hide anything shoppers need to read.
- Look at the product page with the button on it, on a phone too.
- Turn on the closing page if you'll share the link outside your store.
For every setting and option, see Public Previews in the docs.
More guides
- How to offer a free PDF sample in exchange for an email on ShopifyGive visitors a free sample of your PDF for their email address, add the sign-up form to your Shopify product page, and follow up with the tagged customers it creates.
- How to sell PDFs on Shopify and limit sharingSet up PDF sales on Shopify, then cut down on sharing with per-customer links, download limits, stamped buyer details and copy codes. Launch checklist included.
- How to find out who leaked your PDFFound your PDF shared online? Learn what the copy can tell you, from the stamp and copy codes to metadata and hidden marks, and what to do next, step by step.
- How to send a DMCA takedown notice for a leaked PDFWhat a DMCA notice must include under 17 U.S.C. § 512(c)(3), where to send it, a copy-paste template, and the EU alternative under the Digital Services Act.
- Visible vs invisible PDF watermarks: how each protects your filesCompare visible PDF stamps and hidden tracing marks: how they can deter sharing, help trace a leaked copy, and hold up against cropping, editing and printing.