Managing Products
Set up a digital product in Imprint: upload its files, preview the PDF stamp, give it its own watermark text, set files per variant and override download limits.
Last updated
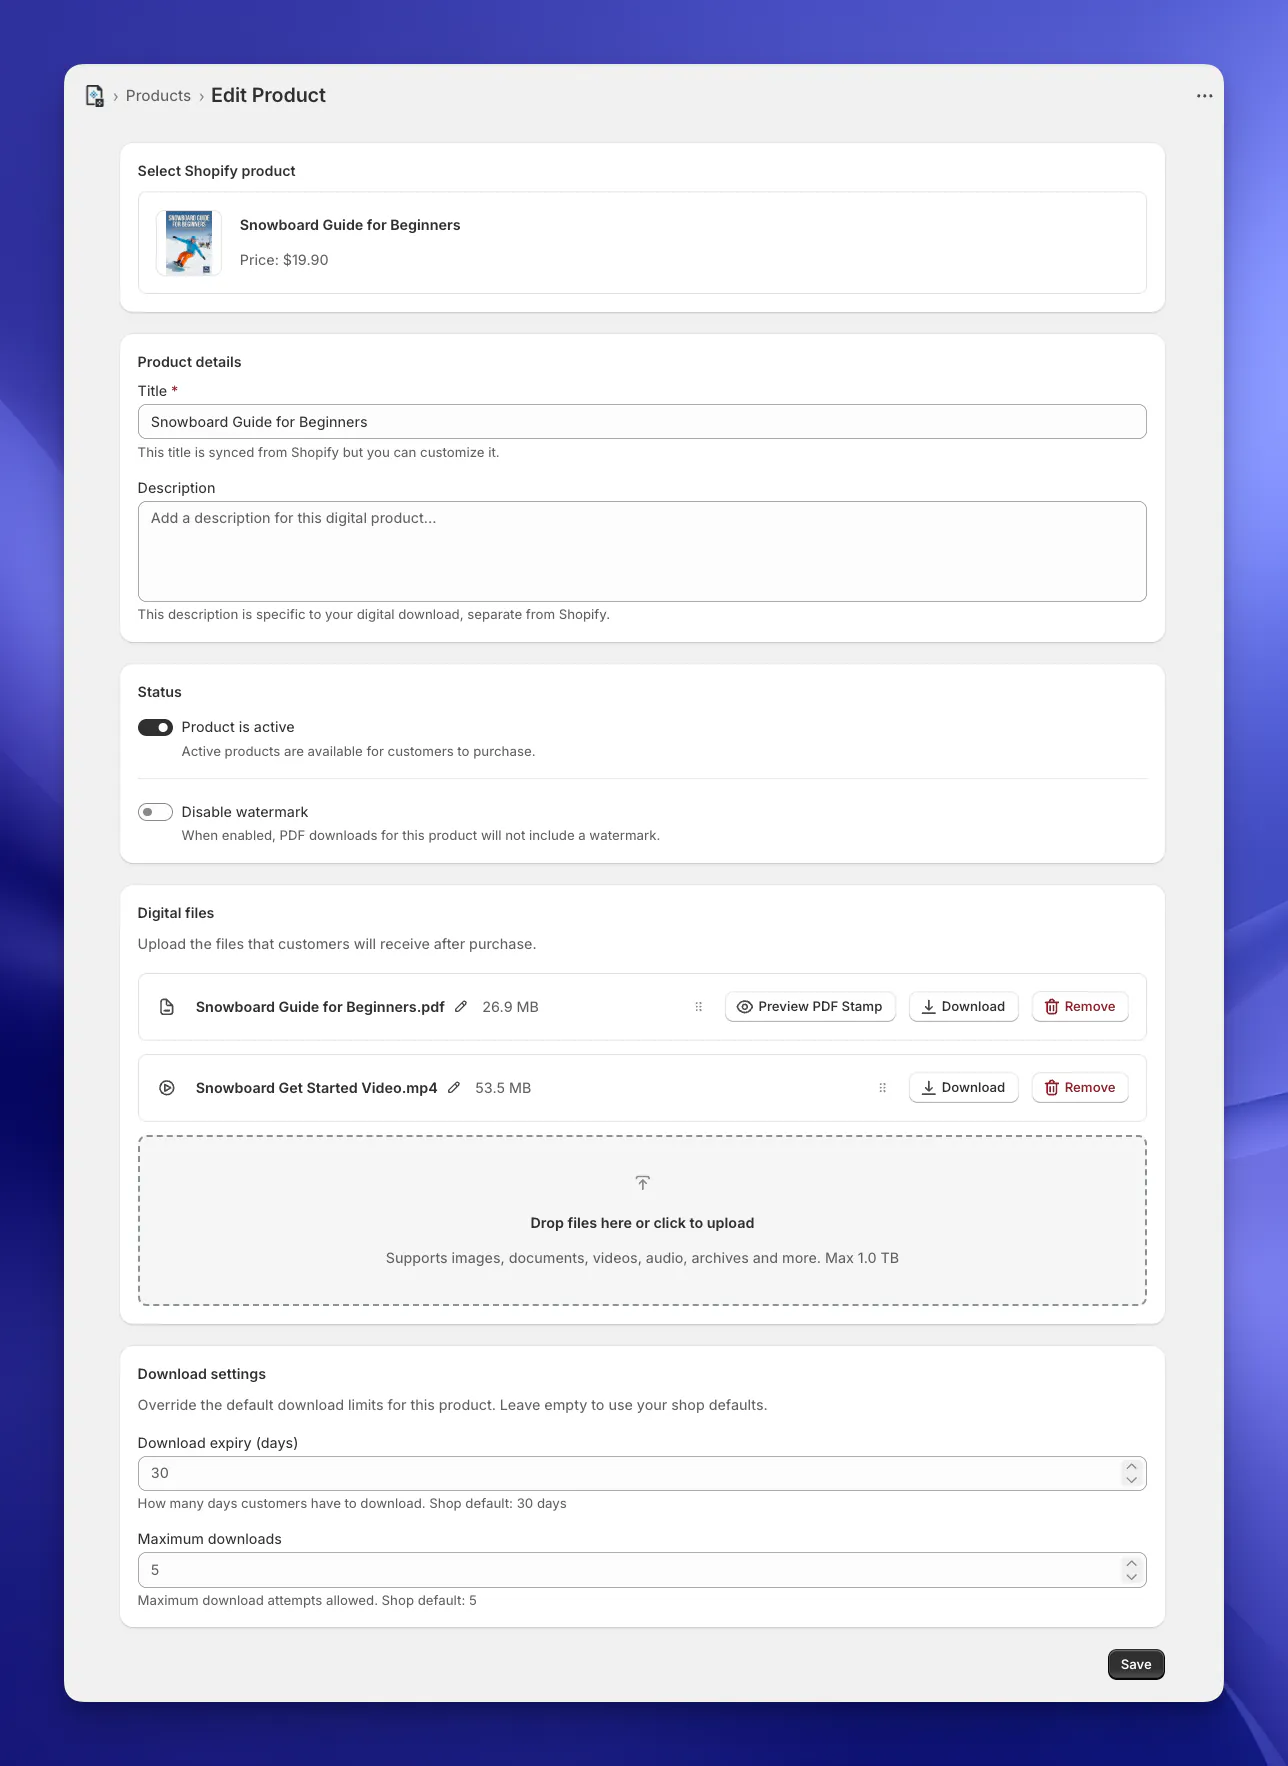
Once you've selected a product from your Shopify catalog, you'll land on the Product Details page. Think of this as the "Mission Control" for that specific item.
Here, you can control exactly what your customer receives, how the product is described in emails, and most importantly, how it is protected.
The Shopify Connection
At the very top, you'll see the Shopify product you picked under Select Shopify product. While you're still creating the product, you can click Change to pick a different one. Imprint keeps a link to the product in your Shopify store and reads its price, image and variants from there, so changes you make in Shopify show up here.
- Title: By default, we sync the title from Shopify. However, you can customize this field if you want the digital download to have a slightly different name in emails and on the checkout downloads (e.g., adding " - Digital Edition" to the end).
- Description: A note about this digital download, kept separate from your Shopify product description. It's for your own reference: you can search for it on the Products page, but customers don't see it.
Status & Security
This section controls the availability and protection of your files.
Product is Active
This is your main "On/Off" switch.
- On (Green): The product is live. If a customer buys it, they get the download email.
- Off (Grey): The product is in draft mode. Emails won't be sent. Useful when you are setting things up or updating files.
Disable Watermark
By default, Imprint's powerful Stamping Engine stamps every PDF your customers download. We highly recommend leaving it that way to prevent piracy.
Turn on Disable watermark if you'd rather deliver this product's PDFs without the visible stamp.
Be advised, this is a per-product setting. To turn PDF stamping off for your whole store, use the Watermark Settings.
Tracing marks still apply. If you use tracing marks (Premium), the invisible tracing marks (and the QR code, if you turned it on) are still added to this product's PDFs when its watermark is disabled. Only the visible stamp is left out.
Watermark Text
By default, a product's PDFs are stamped with the text from your Watermark Settings. On the Premium plan, you can give a product its own text instead. A product you sell as a licence can say who it's licensed to and for how many copies, while your ebooks keep the shop's shorter stamp.
The Watermark text section is below the status switches.
- Watermark text for this product: The text to stamp on this product's PDFs, up to 500 characters. The field shows your shop's text as a placeholder. Leave it empty to use the text from your watermark settings.
- Insert variable: The same buttons as in your watermark settings: the built-in variables, such as Customer Name, Quantity and Copy/copies, and a button for each of your custom variables. A click adds the variable to the end of the text.
- Unknown variables: If the text uses a variable Imprint doesn't know, you'll see Unknown variables under the field, followed by the variable. Add it as a custom variable in your watermark settings, or remove it from the text. The product can't be saved until you do.
- Lines: Choose One line or Several lines for this product. Same as your watermark settings follows the Display on multiple lines switch there, and shows which one that is, for example Same as your watermark settings (One line). You can change only the lines and keep the shop's text.
- Preview: The stamp as it will look, with sample values such as
John Doe,#1001and12 copies. With the field empty, it shows your shop's text.
What Still Comes From Your Watermark Settings
The product's text replaces the shop's text and line setting, and nothing else. These still come from your Watermark Settings:
- The position, font size, color and opacity.
- First page only.
- The copy code, when Always append the copy code is on.
- Your custom variables. The product's text can use them, but you add and change them in your watermark settings.
The product's text doesn't decide whether its PDFs are stamped. That still depends on the Disable watermark switch above, and on Enable watermark and Apply to all PDFs in your watermark settings. If one of them turns the stamp off, the section shows a warning that the text isn't used.
The product's free samples are stamped with its text too. Order details, such as the customer's name and the quantity, are empty on a sample, so they drop out of the stamp. Include {email} if the sample should still carry the visitor's email.
On the Preview PDF Stamp Page
Once you save, the Preview PDF Stamp page uses the product's text and lines in its stamped preview. When the product has its own text or lines, the Watermark Info box says This product has its own watermark text settings. under the preview text.
Example: A Licence Stamp
Say the text in your watermark settings is {email} - Order {order_number}, which suits your ebooks. You also sell a workbook that schools buy in bulk, one licence per copy. On the workbook's product page:
- Under Watermark text for this product, type
Licensed to {name} for {quantity} {copies}, or build it with the Customer Name, Quantity and Copy/copies buttons. - Set Lines to One line, so the sentence isn't split over several lines.
- Click Save.
John Doe buys 12 copies, and his workbook is stamped Licensed to John Doe for 12 copies. Your ebooks are still stamped like [email protected] - Order #1001. If you append the copy code, both get it at the end.
{quantity} and {copies} are explained under Quantity and Copies. When a company buys the licence through Shopify B2B, {company} stamps the company's name (see B2B Company Names). For more about licences, see Licence Stamping.
Your Plan and the Watermark Text
- Free and Basic: The section is locked, with an Upgrade to the Premium plan to access notice. Products are stamped as set in your watermark settings.
- Moving down from Premium: Each product's text and lines are kept, but not used. Their PDFs are stamped with your shop's text and lines again. The locked section still shows the saved text, and it's used again if you return to Premium.
- Custom variables in use: On Premium, your watermark settings won't let you remove or rename a custom variable that a product's text still uses. Saving fails with a message that names up to three of those products. Remove the variable from their text first.
Digital Files
This is where the magic happens. You can upload the actual assets your customers are buying.
Drag, Drop, Done.
Simply drag your files into the upload box at the bottom, or click to browse. We support a huge range of file types including PDFs and other documents, eBooks, Images, Design files, Videos, Audio, Archives (ZIP, RAR, 7z), Fonts and 3D files.
How big each file can be depends on your plan: up to 100 MB on Free, 1 GB on Basic, and no limit on Premium. See Pricing & Plans.
Changing the order
You can drag and drop the files by the drag icon to change the order in which they appear when the download links are presented to the user.
Renaming files
You can click on the file's name to change the name of each file. This is used as the filename the user sees after downloading, depending on your download settings.
Managing Uploads
Once uploaded, your files appear in the list.
- PDF Files: Once the product is saved, you will see a special Preview PDF Stamp button. Click this to see a real-time example of how the watermark will look on your specific document before you sell it. The preview uses placeholder customer details, and the product's own watermark text if it has one. Switch between Stamped Preview and Original PDF to compare, and download either one. If you use tracing marks, the preview includes them too, with a sample copy code. The same page is where you set up a public preview of the PDF's first pages and a free sample.
- Other Files: For videos or other media, you can verify the file is correct by clicking Download.
Pro Tip: To attach multiple files into one product like this example, the Basic plan or higher is required.
Previews and Samples
Once a saved product has a PDF, its page shows a Previews and samples card. For each PDF, it lists the link of its public preview and of its free sample page (Basic and Premium), with buttons to copy the link or the code of a button that opens it. Click Set up or Change to open the PDF's page, where you turn them on and choose their settings.
Handling Product Variants
Does your product have options in Shopify (like Size, Color, or Edition)? Imprint automatically detects these and gives you special controls to manage them.
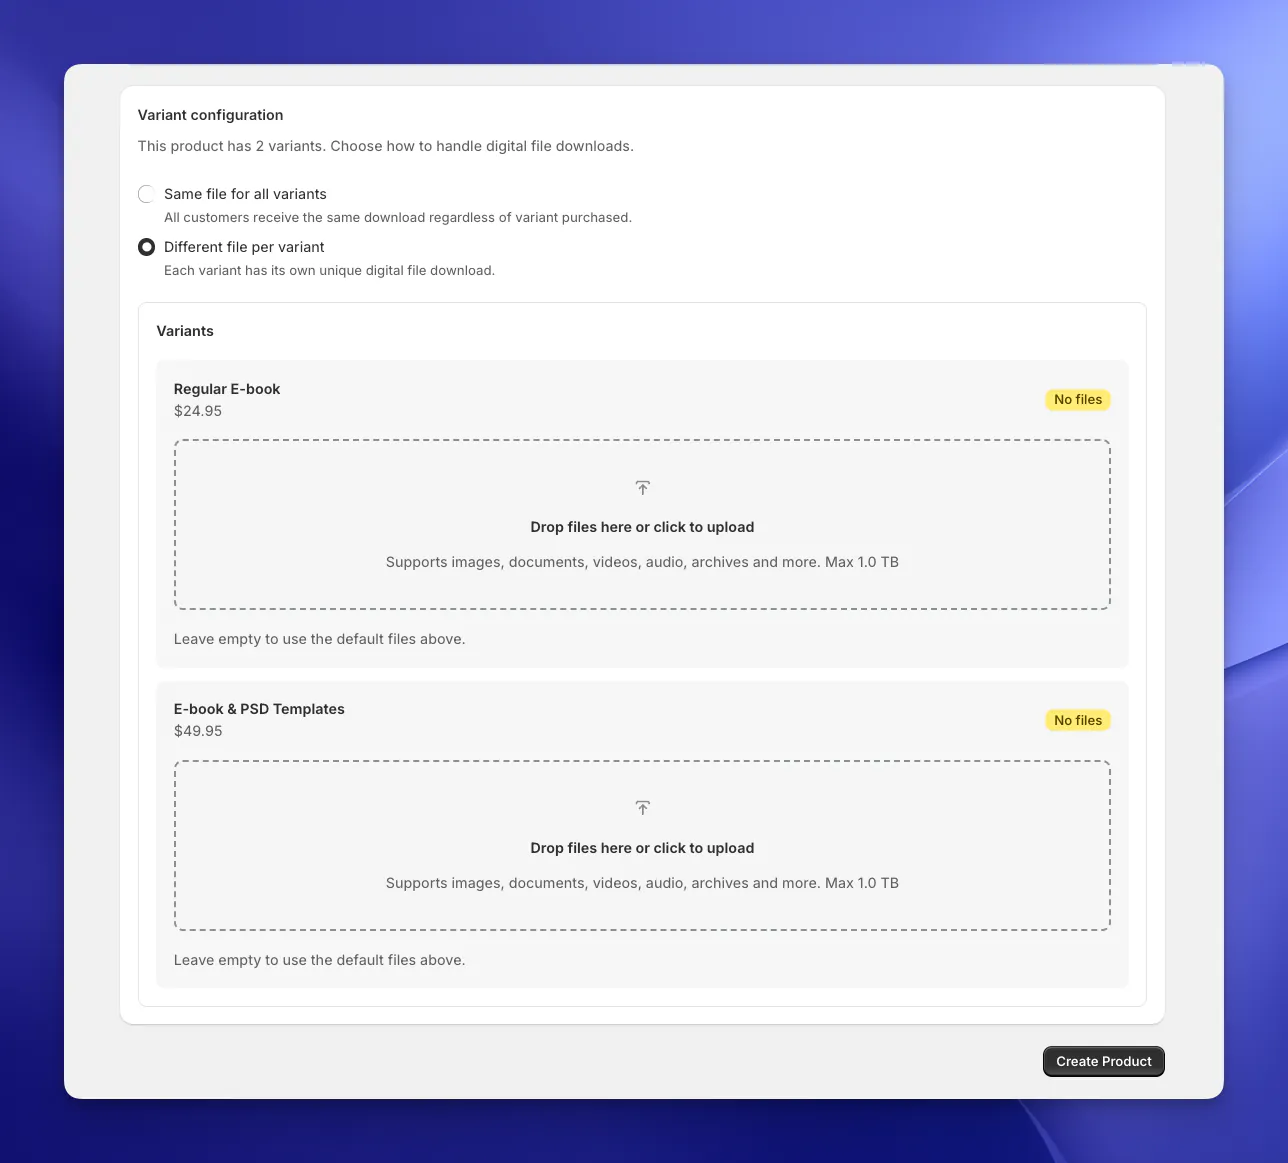
If your product has variants, you will see a Variant configuration section appear. Under File mode, you have two powerful choices:
Option 1: Same file for all variants
- Best for: Products where the digital bonus is identical regardless of the choice (e.g., selling a T-shirt in S/M/L that comes with the same generic PDF guide).
- How it works: Select Same file for all variants. All customers will receive the main file you uploaded at the top of the page.
Option 2: Different file per variant
- Best for: Tiered digital products or "Deluxe" editions.
- How it works: Select Different file per variant. This unlocks individual upload areas for every single option. A variant you leave empty uses the default files uploaded above.
Example: In the screenshot above, you can see a tiered setup:
- Regular E-book ($24.95): You would upload just the PDF here.
- E-book & PSD Templates ($49.95): You would upload the PDF and the source files here.
This ensures that the customer who pays more gets the extra content automatically!
Lots of variants?
Products with many variants show them a page at a time. Use Search variants to find one by its name or SKU, and the File status filter to show only the variants With custom files or those Using default files.
Overriding Download Limits (Per Product)
Sometimes, one size doesn't fit all. You might have a "Limited Time" product that needs strict limits, or a "Lifetime Access" bundle that should never expire.
At the bottom of the product page, you will find the Download settings section. These controls allow you to override your global store defaults just for this specific item.
- Download expiry (days): Enter a number here to set a custom expiration time. For example, you could set this to
365for a year-long course, or2for a flash sale. - Maximum downloads: Enter a number to restrict or expand the number of download attempts allowed.
Note: If you leave these fields empty, Imprint will automatically use the Shop Defaults you configured in your Download Settings (out of the box: 7 days / 3 downloads). Click Reset to defaults to clear both fields.
Don't forget to Save!
When you are happy with your setup, hit the black Save button in the bottom right corner (or Create Product for a new one) to push your changes live. You can also use the Save bar Shopify shows at the top of the page as soon as you change something.
Product Dashboard
Add Shopify products to Imprint one at a time or in bulk, publish, unpublish or delete several at once, filter your catalog, and keep an eye on your storage.
Managing Orders
Track download deliveries on the Imprint Orders page: resend emails, reset limits, extend or restrict links, retry failed orders and find an order by its code.