# Watermark Settings (/docs/watermark-settings)
The **Watermark Settings** page is the control center for your store's anti-piracy features.
Imprint's "Stamping Engine" takes the customer's personal information and permanently overlays it onto the PDF file at the exact moment of download. This discourages them from sharing the file publicly, as their personal data (like email or name) is attached to it.
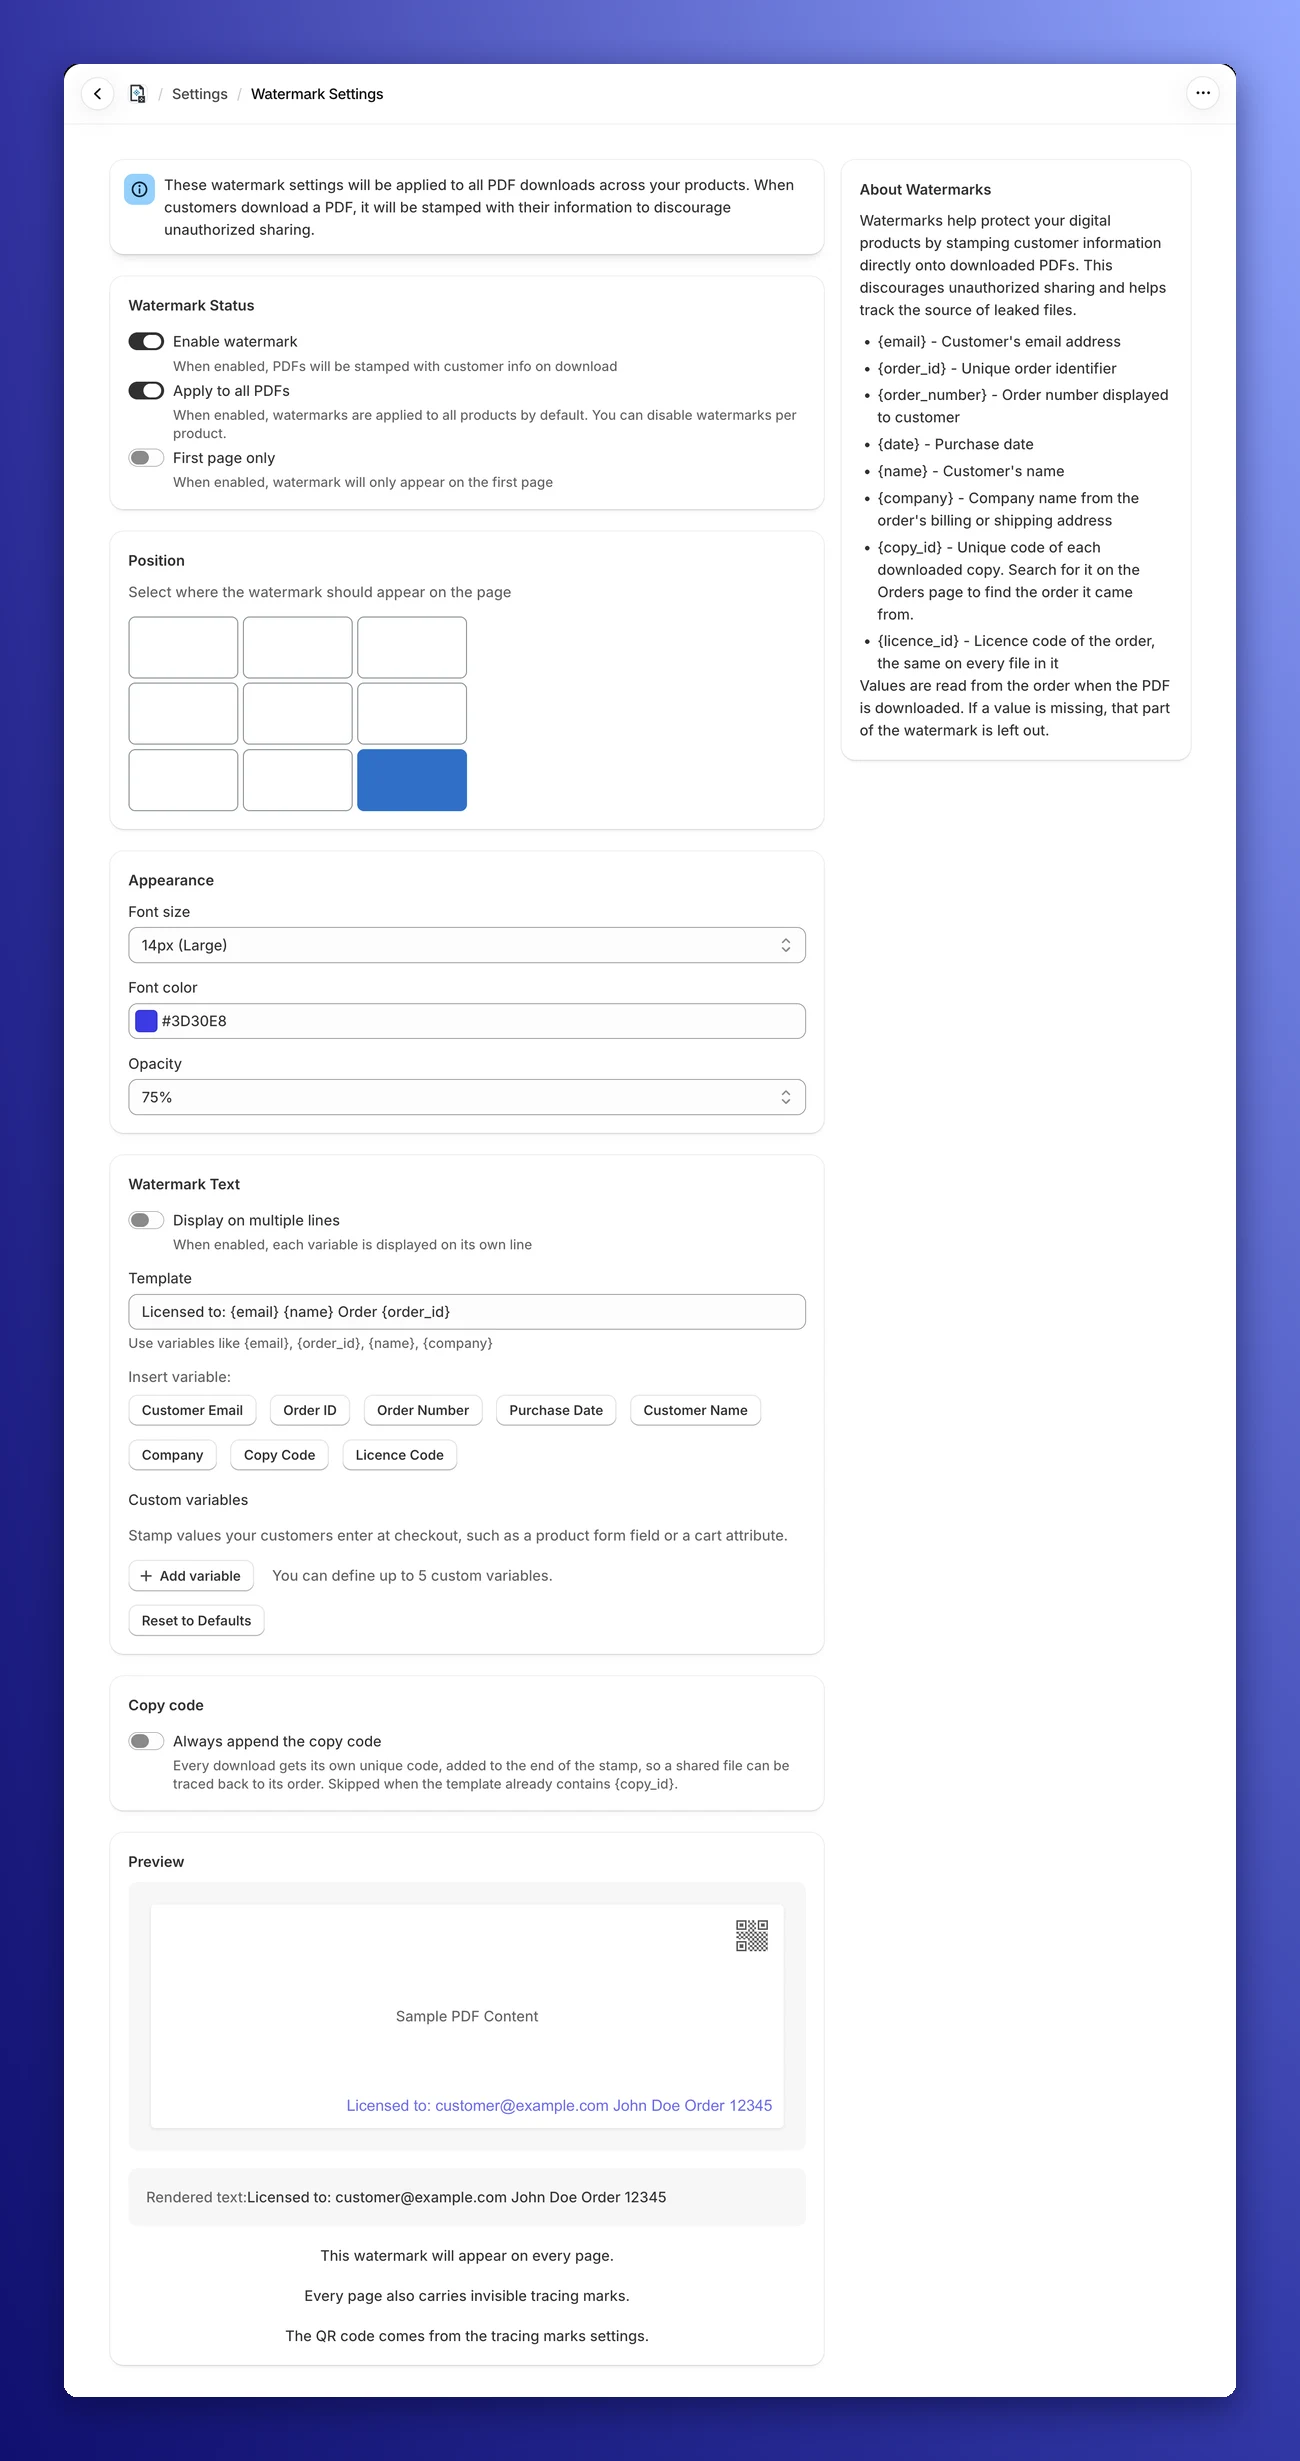
{/* TODO screenshot: retake Settings → Watermark so the Insert variable: row shows the new Quantity and Copy/copies buttons */}
---
## Watermark Status [#watermark-status]
These controls determine *when* and *where* watermarks are applied. These features are available on **all plans**.
- **Enable watermark:** The master switch. When enabled, PDFs will be stamped with customer info on download.
- **Apply to all PDFs:**
- **On (default):** Every PDF in your store is stamped. To leave out a specific product, switch on **Disable watermark** on that product's page.
- **Off:** No PDFs are stamped, on any product.
- **First page only:**
- **On:** The stamp appears on the first page only. Every other page stays clean.
- **Off:** The stamp repeats on every page of the document (Recommended for maximum security).
---
## Advanced Customization [#advanced-customization]
On the Free plan, every PDF gets the standard stamp: the customer's email, centered at the bottom of the page, in 12px gray at 50% opacity. Upgrading gives you full creative control:
### Position [#position]
Don't let the watermark cover your content. You can choose exactly where the stamp appears on the page.
- **Grid Selector:** Simply click one of the 9 boxes to place the text (e.g., Top Right, Middle Center, or Bottom Center).
### Appearance [#appearance]
Make the watermark subtle or bold.
- **Font size:** Choose from **8px (Extra Small)** up to **24px**. The default, `12px (Medium)`, is readable without being intrusive.
- **Font color:** Use the color picker to match your brand's palette or choose a subtle grey (`#666666`, the default).
- **Opacity:** Choose **25%**, **50%** (the default), **75%** or **100%**. A lower percentage makes the text see-through so it doesn't block the underlying text of your PDF.
### Long Stamps Fit the Page [#long-stamps-fit-the-page]
You don't have to worry about a stamp running off the edge. If a line is wider than the page, for example a long email address with the copy code added, Imprint prints that line in a smaller font so it fits between the page margins. In multiline mode, the whole block shrinks to fit its longest line. Stamps that already fit keep the font size you chose.
**Pro Tip:** Use the **Preview PDF Stamp** button on a product's page to see the real stamp on your own file. [Learn more](/docs/product).
---
## Watermark Text & Variables [#watermark-text--variables]
This is where you define *what* information is actually stamped. You can mix static text (like "Licensed to") with dynamic **Variables**.
### Template System [#template-system]
The **Template** field allows you to construct your unique stamp text (up to 500 characters).
- *Example:* `Licensed to {name} - {email} - Order {order_number}`
- *Result:* `Licensed to John Doe - customer@example.com - Order #1001`
If your template contains a variable Imprint doesn't know, you'll see **Unknown variables** under the field. Define it as a custom variable (see below) or remove it from the template before saving.
### Display on Multiple Lines [#display-on-multiple-lines]
Switch on **Display on multiple lines** to stack the stamp instead of printing one long line. Each variable goes on its own line, together with the text in front of it, and separators like ` - ` or ` | ` are left out. The same example template becomes:
```
Licensed to John Doe
customer@example.com
Order #1001
```
Text that ends with a colon, like `Email:`, gets its own line above the value, without the colon.
### Available Variables [#available-variables]
Click the buttons under **Insert variable:** to add these placeholders to your template:
| Variable | Button | What gets stamped |
| :--- | :--- | :--- |
| `{email}` | Customer Email | The customer's email address. |
| `{order_id}` | Order ID | Shopify's internal order ID, a long number (e.g., `5927384756123`). |
| `{order_number}` | Order Number | The order number your customer sees (e.g., `#1001`). |
| `{date}` | Purchase Date | The date in year-month-day format (e.g., `2026-10-16`). It is filled in when the file is downloaded, so it shows the download date. |
| `{name}` | Customer Name | The customer's full name. |
| `{company}` | Company | The company name from the order's billing address, or else the shipping address, or else the customer's default address. On Premium, a Shopify B2B order stamps the name of the company that placed it (see [B2B Company Names](#b2b-company-names)). |
| `{copy_id}` | Copy Code | A unique code for each downloaded copy (e.g., `IMP-7K3QZ9M2PXP`). |
| `{licence_id}` | Licence Code | The order's licence code, the same on every file in the order (e.g., `H4R8TW2N`). |
| `{quantity}` | Quantity | How many copies of the product the order bought (e.g., `12`). See [Quantity and Copies](#quantity-and-copies). |
| `{copies}` | Copy/copies | The word "copy" or "copies" to match `{quantity}`, in the language of your Shopify admin. |
`{copy_id}` and `{licence_id}` come from [Copy tracking](/docs/copy-tracking) (Basic plan or higher). On the Free plan, their buttons are locked and they are left blank on stamps.
**Missing values are left out.** Values are read from the order when the PDF is downloaded. If a value is missing (for example, the customer didn't enter a company), that part of the watermark is dropped together with its label, so you never get a dangling "Company:" on the page:
- *Template:* `Company: {company} - Email: {email}`
- *Result without a company:* `Email: customer@example.com`
### Quantity and Copies [#quantity-and-copies]
Use `{quantity}` and `{copies}` to turn the stamp into a licence line that says how many copies the customer bought. Both are available on the Basic and Premium plans, like the rest of the watermark text. For a step-by-step setup and more examples, see [Licence Stamping](/docs/licence-stamping).
- *Template:* `Licensed to {name} for {quantity} {copies}`
- *Result:* `Licensed to John Doe for 12 copies`, or `Licensed to John Doe for 1 copy` for a single copy.
{/* TODO screenshot: the Watermark Text section with the licence template from this example in the Template field and the Preview reading "Licensed to John Doe for 12 copies" (the same image can serve licence-stamping.mdx's Setting Up a Licence Stamp) */}
**How the quantity is counted.** `{quantity}` is the quantity on the order, as the customer bought it. If the product is on more than one line of the order, such as two variants that share a file, the lines are added up. When variants have files of their own, each file counts only the variants it's delivered for. Editing the order in Shopify later doesn't change the number. Like the other variables, it's read when the file is downloaded, so it also works for orders placed before you added it to your template.
The quantity only changes what is stamped. A customer who buys 12 copies gets the same download link and download limit as for one copy.
**The word for the copies.** `{copies}` is in the language of your Shopify admin, not in the customer's language. A German store stamps `12 Exemplare`, and a Polish one `3 egzemplarze` or `12 egzemplarzy`. The stamp's font can't draw the Greek, Japanese and Hungarian words, so stores whose admin is in one of those languages get the English word. If Imprint isn't translated into your admin's language, the word is in English too. See [The Word in Your Language](/docs/licence-stamping#the-word-in-your-language) for every language.
**When there's no quantity.** `{quantity}` and `{copies}` are empty on [free samples](/docs/free-samples) and when the order doesn't contain the product. They're then left out together with the text in front of them. For an order without the product, the example above stamps `Licensed to John Doe`.
**Refunds.** The stamped quantity never goes down. A refund that includes the product revokes its download links instead, even when it refunds only some of the copies. To let a buyer keep the rest of their copies, see [Refunds and Licences](/docs/licence-stamping#refunds-and-licences).
**On multiple lines.** With **Display on multiple lines** on, each variable starts a new line together with the text in front of it, so the example stamps three lines: `Licensed to John Doe`, `for 12` and `copies`. Leave the switch off to keep the licence on one line.
### Custom Variables [#custom-variables]
Want to stamp something your customer typed in at checkout, like the name of the person a licence is for? Under **Custom variables**, click **Add variable** and fill in:
- **Variable name:** The name you'll use in the template, in lowercase letters, numbers and underscores (e.g., `licensee` becomes `{licensee}`). It can't be the name of a built-in variable, such as `quantity`.
- **Source:** Where the value comes from:
- **Line item property:** A field the customer fills in on the product page before adding to cart (a product form field).
- **Cart attribute:** A field the customer fills in on the cart page.
- **Field name in Shopify:** The field's name exactly as it appears on the order (e.g., `Licensee name`).
Once a variable has a name, it gets its own button under **Insert variable:**. You can define up to **5** custom variables. If a product appears more than once in an order with different values, all of them are stamped, separated by commas.
Because values are read when the file is downloaded, a new custom variable also works for orders placed before you added it.
On Premium, you can't remove or rename a custom variable while a [product's own watermark text](#a-products-own-watermark-text) uses it. Imprint tells you which products use it when you click **Save**, so you can change their text first.
The **Reset to Defaults** button at the bottom of this section puts every setting on the page back to its default: the `{email}` template with no custom variables, Bottom Center, 12px gray at 50% opacity, and the switches as a new store has them. Click **Save** afterwards to keep the change.
---
## Copy Code [#copy-code]
Every download gets its own unique copy code. Switch on **Always append the copy code** to add it to the end of every stamp, so a shared file can be traced back to its order.
- **Single line:** The code is added at the end, e.g., `customer@example.com - IMP-7K3QZ9M2PXP`.
- **Multiple lines:** The code goes on its own last line.
- **Already in your template?** If your template places `{copy_id}` itself, nothing is added, so the code never appears twice.
This switch is on by default for new stores. If you already used Imprint before copy codes were introduced, it starts off until you switch it on.
To find the order a code belongs to, see [Copy tracking](/docs/copy-tracking).
---
## Live Preview [#live-preview]
As you adjust the settings above, the **Preview** section updates in real-time.
- It shows a sample page ("Sample PDF Content") with your stamp applied, using sample values such as `customer@example.com`, `John Doe`, `#1001` and `12 copies`. `{copies}` is shown in your admin's language, as it will be stamped. Custom variables show as "Sample" followed by the field name.
- **Rendered text:** shows the exact text that will be stamped.
- A note tells you whether the watermark will appear on every page or only on the first page.
- If you use [tracing marks](/docs/tracing-marks) with a QR code, the preview also shows the QR code in its corner, so you can keep the stamp clear of it.
If watermarks are switched off, the preview shows a warning instead of the stamp.
---
## Licence Stamping [#licence-stamping]
Premium adds two things to the watermark text. The **Upgrade & Plans** page lists them as **Licence stamping**.
### A Product's Own Watermark Text [#a-products-own-watermark-text]
A product can have its own watermark text and line setting, which its PDFs use instead of the ones on this page. The position, appearance, **First page only**, copy code and custom variables still come from this page. See [Watermark Text](/docs/product#watermark-text) in Managing Products.
### B2B Company Names [#b2b-company-names]
On a Shopify B2B order, `{company}` stamps the name of the company that placed the order. On other orders, `{company}` is the address company described under [Available Variables](#available-variables).
For example, a school buys 3 copies as the B2B company Northwind School Ltd, and the order's billing address has the company Northwind Accounts. With the template `Licensed to {company} for {quantity} {copies}`, the download stamps:
- *On Premium:* `Licensed to Northwind School Ltd for 3 copies`
- *On Basic:* `Licensed to Northwind Accounts for 3 copies`, the company on the billing address
Imprint asks Shopify for the company's name when the order is paid. On Premium, it does this before it creates the download links, so the first download is already stamped with the name. If Shopify doesn't answer, Imprint tries again over the next 20 minutes or so. Until Imprint has the name, downloads stamp the address company. B2B orders that reached Imprint before B2B support was added aren't marked B2B, and their stamps keep the address company.
Like any order, a B2B order with payment terms, such as Net 30, gets its download links once it's paid. On every plan, the order page shows a **B2B** badge and the company's name (see [B2B Orders](/docs/orders#b2b-orders)).
Stamp who each PDF is licensed to, for how many copies, and for which company.
---
## Invisible Tracing Marks [#invisible-tracing-marks]
The visible stamp isn't the only way to mark a copy. In **Settings → Tracing Marks**, you can hide each download's copy code inside the PDF and add an optional QR code.
Tracing marks are separate from the watermark: they are added even when the watermark is off, when **Apply to all PDFs** is off, and on products whose watermark is disabled.
Not sure which kind of mark you need? Our guide compares [visible and invisible watermarks](/guides/visible-vs-invisible-watermarks).
Learn how to hide copy codes in your PDFs to trace leaked files.